Treading Lightly
Treading Lightly

The Story of Stuff

This week I will be focusing on our consumption and ways to cut down on the thing we throw out, the unnecessary items that clutter our space, and how to be a proactive consumer.

I am going to let Annie Leonard introduce the basic ideas of consumption and where our stuff comes from. I saw The Story of Stuff video for the first time a few years ago and it completely changed the way I think about the things that I buy and own.

Check back later in the week for more on reducing your consumption!

Kick that plastic bottle to the curb: Plastic-free water bottles

Do you know how much you are spending on bottled water every year? Bottled water on average is more than 2,000 times more expensive than tap water. Americans spent more than $15 billion on bottled water last year.

In light of the current known dangers of bottled water and the waste they create, I wanted to compile some reusable water bottle options. I am not endorsing any of the products I highlight here, but rather I tried to find as many BPA free bottles with the most plastic being the lids. The reason I keep the plastic to be a minimum was because of the current uncertainties about plastic bottles leaching.
Instead of wasting money and resources on bottled water many people are opting to buy a reusable water bottle instead; however, it is often difficult to know which water bottle to buy when there are so many options. In this post I listed plastic-free water bottles made out of glass and metal that I have thoroughly researched (but not personally tested) so you don’t have to.

Glass

 
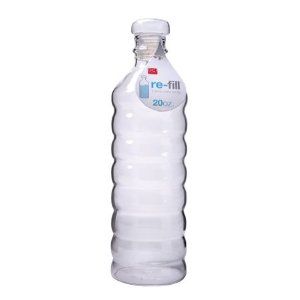
DCI glass water bottle has a cap with a silicone seal. It does not seem safe to toss into a bag however. It is 20 oz for $12
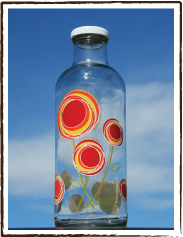
 Be Truly You’s bottles are made of approximately 20% recycled glass and they are painted with ceramic-based, led free paint. (The materials of the lid are not disclosed, but it appears to be plastic. They do say that their products are 100% BPA free). They are 20 oz for $18.
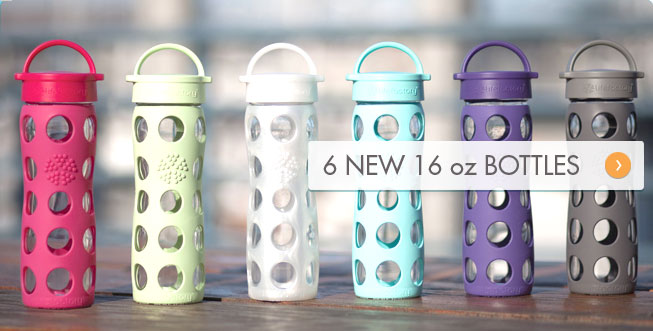
Lifefactory’s glass water bottle has a BPA free lid and a silicone sleeve to help protect the bottle. It comes in a few different sizes and in many different colors. This is also the glass bottle with the most reviews online, and the majority were positive. the largest is 22 oz for $22. It’s also the bottle I have used (and loved) for years.
bkr‘s bottles are made out of glass with a silicone sleeve to protect it. They are 16 oz and the price depends on the retailer at the moment. The most interesting thing about these bottles is that if you break yours you can send all of the pieces back to bkr with a note explaining why you love it and they will send you a new one, you just have to pay for shipping.
Love Bottle are simple glass bottles that can be easily customized and decorated. They also have locking lids to make them more secure for traveling. 1 liter is $19.00, also come in a .5 liter.
Keeping it simple: you can also use a mason jar, commuter mug, or a glass that you already own; however, keep in mind that these are difficult to travel with.

Bamboo

Bamboo Bottle Company: This bottle has a bamboo exterior that surrounds a glass tube inside. The water only touches the glass and the lid. Basically the bamboo is to protect the glass. The inside glass piece is removable and dishwasher safe. It is 17oz for $25.

Aluminum

Gaiam aluminum water bottles hold 25.36 fl. oz. for $9.98. The bottles are coated in a “thin, food-grade epoxy resin that meets U.S. Food and Drug Administration requirements for toxic elements in foodware.” (To be perfectly clear I do not know how safe this lining actually is.)
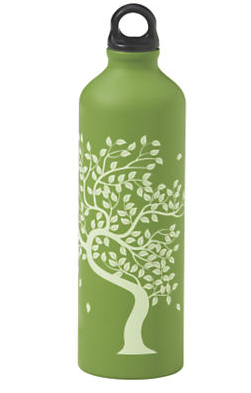
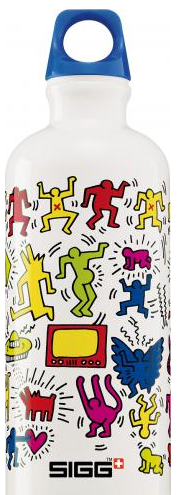
Sigg is 1 liter for $24.99. It has a BPA free liner and they come in many different sizes with a few different options for lids including a sport top.

Stainless Steel

Nalgene stainless wide mouth water bottle $26.99
Swell 17 oz for $35
Klean Kanteen come in a wide variety of beautiful colors and sizes. They also have insulated and wide mouth options. The bottles have a choice of sport or loop top lids, or stainless steel for a bit extra. Their most recent bottle is made with a bamboo lid. 27 oz for $17.95.
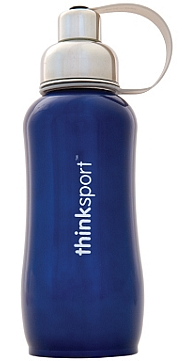
Thinksport stainless steel is insulated and has a sport top. 25 oz for $20.

Important things to consider before buying!

The first thing you need to think about is what you expect out of a bottle and which one will best fit your lifestyle. If you spend your day at a desk and in the car, a glass water bottle would work well for you. If you are at school all day and you need something that can roll around in your bag, glass would be a terrible idea. The nice thing about glass is that it is easily recyclable and it does not take many resources to create.
With all bottles consider how hard it will be to clean, how safe it will be throughout its use, and what exactly you want to do with it (ie. hiking, gym, work, school, at home ect.). If you have the time, it is also good to know where the bottle is manufactured, how easily it can be recycled when you are finished with it, and the resources (ie. carbon) it will take to get it to you.

Personal Experience

I love my glass water bottle, but I have broken a couple of them in the past. I have also had both a Sigg and Klean Kanteen in the last few years. To be perfectly honest, I abuse my water bottles. Over the summer they would often take a 5 foot plunge off a lifeguard chair onto the concrete below. They get banged around in my backpack and for some reason I am constantly letting them slip through my hands. Needless to say both my bottles look well loved, but my Klean Kaneteen is sturdier and better designed for my abuse. The aluminum of the Sigg just is not strong enough to withstand my lifestyle. I also love my Klean Kanteen because it is not lined which means that I do not have to worry about it chipping off like my Sigg did. If you have a tendency to abuse water bottles or you want it to look pristine for as long as possible do not buy a colored bottle (the color tends to chip off near scratches and dents).

Moneyless Mother’s Day

For those of us who are not living at home, don’t panic, you didn’t miss it. Mother’s day is on May 8th this year and I wanted to post some ideas of things to make or do with your mom without pulling out your wallet.

Instead of trying to find something to buy your mom this year, consider all of the things you could do with your mom, for your mom, or make for your mom that she would love and appreciate even more than things with a price tag on them.

I know we are no longer kindergarteners who are ecstatic to bring home an indecipherable drawing or macaroni craft project, but your mom would still love to have something you made, even if it still doesn’t look that great.

Photo courtesy of durango mom
All of the ideas below of things that you can make or do for your mom and most can be made with objects you already have lying around or things you would throw out otherwise.

Live far away and can’t go home for Mother’s Day? No worries, most of these things can be digitally sent or easily mailed. Just don’t forget to plan ahead so she gets it before Mother’s Day.

These are listed in order of easiest to craftiest : )

1. The easiest suggestion here: ask your mom what she wants to do! There is no guesswork and you know your mom will love it.

2. Turn off the TV. The least you could do on Mother’s day is talk and reconnect.

3. Take a family photo with her. You know your mom is always begging for a nice picture of you.

4. Take a walk or do some other activity that your mom enjoys like hiking, knitting, scrapbooking, gardening, running, ect.

5. Drag out a family favorite card or board game and play it together.

6. Make coupons. I know they are corny and we have probably all made them dozens of times and then whined when your mom cashed in all of the chores you said you would do, but consider doing them again. They can be anything from a coupon for a walk with you to painting a room or doing some other chore. Get creative! Just don’t forget to make them things she might actually want and that you can actually do.

7. Write your mom a letter. Not through email or typing it, but actually sit down and write it down on some nice paper.

8. Make a card. You can grab some cardboard set to be recycled and cover it in paper, wrapping paper, or any other material to spruce it up a bit.

9. Make a short video or slide show with pictures of your family and some nice music that sets the scene or is a family favorite.

10. Make a small scrapbook out of paper and some cardboard. You can punch holes in your cardboard pages and tie it all together with some ribbon or string.

11. Make jar picture frames. Grab some clean empty glass jars and bottles and simply place the picture inside. A quick warning to those of you who are college students: although that bottle you picked looks really interesting, check to make sure it’s not an alcohol bottle or something else that might lead to unwanted questions.

Photos courtesy of Photojojo

12. Make her favorite dessert or food. Even if it doesn’t turn out quite right, I bet she will love it. Just remember to completely clean up when you are done.

13. Plant flowers for her or make her a flower pot so she can put her favorite plant in it. If you don’t want to by a cheap clay pot and decorate it there are many other creative ideas to make something different here.

14. Make her a cool saying, word, or picture out of cardboard strips like this.

Photo courtesy of 4 Crazy Kings

15. Make a memory jar. Write down your favorite memories with your mom on a nice piece of paper and place it into a clean jar that you can decorate.

Get creative! Look around and think of all of the things you can make out of the objects around you that would make your mom smile.

If you come up with something amazing comment on this post so we can all benefit from your brilliance : )

No matter what you do just remember that Mother’s Day isn’t about buying something to prove you love her. It’s about celebrating your mom and your relationship with her.

Upcycling

Last night I stumbled across the project 30 days 30 things by college students at the University of Applied Arts in Vienna where they are taking items and upcycling them into new, functional things.

Upcycling is when an object that would have been thrown out or recycled is repurposed into a new object. In this case they use things from plastic water bottles to found pieces of styrofoam boards.

The things they made are beautiful. The picture above are scarves made out of old t-shirts.
These practical seat protectors were plastic bags repurposed into functional and aesthetically pleasing rain guards.

The more I look at their projects the more I wish I had thought of them. Pure genius.

For more ideas projects you can do, check out 100 upcycling ideas.

Photos courtesy of 30 days 30 things

Quick and Easy Buttermilk Biscuits

I am fascinated by the idea of making my own bread. To me it seems like the true self-sufficiency- creating such a true staple of my diet instead of buying it from some large company and wasting the packaging and all the other resources necessary to get it to me.

The problems with this ideal are that 1. I live in a dorm with the smallest kitchen humanity has ever encountered (the images of the kitchen you see here are from my family’s home where they graciously let me explode food all over it on the weekends) that is shared with the entire 50 residence on my hall and 2. I have no time to nurture bread like it needs to be, including all of the time it takes to rise, knead, and bake.
Instead I will have to stick to easy recipes like these buttermilk biscuits that need little love and attention to turn out wonderfully. These are perfect for anyone with a busy schedule. They only took me 25 minutes from start to finish (from taking out the ingredients to serving them).
Ingredients:
2 cups whole wheat flour
2 tsp baking powder
1/2 tsp baking soda
1 tsp sugar
1 tsp kosher salt
1 cup cold buttermilk
8 tbs butter, melted, plus a bit more for brushing onto the tops
* Don’t forget to try to choose local and organic ingredients
I altered this recipe to whole wheat instead of white flour and they still tasted amazing. They do not have a strong whole wheat taste at all. I did this to be slightly healthier, but keep in mind you really can’t redeem a biscuit. It is what it is.
These biscuits took no skill at all and they came out great. I used a 1/4 cup scooper to shape them, but a simple 1/4 cup measuring cup would work just as well. The recipe was supposed to make 12 but somehow I ended up only making 9… oh well, mine were just more generous scoops.
These were a nice little addition to the asparagus soup and would really go well with any soup or other light meal.

Asparagus Soup

This weekend I decided to make asparagus soup. I chose the soup because I love when it is spring and asparagus is finally coming into season. Asparagus is also full of vital nutrients including folic acid, vitamin K, vitamin C, and many antioxidants. This low calorie superfood made a delicious soup.

Ingredients:

1 lb asparagus*
2 celery stalks, diced
2 tablespoons butter (optional)
2 medium sized potatoes, peeled and cut into 3/4 inch chunks
1/4 cup onion, diced (about 1/2 of a medium sized onion)
5 cups vegetable broth
The beauty of this recipe is that at the end it is blended, so you do not have to worry too much about your knife skills.
This recipe was adapted by my mom and I to cut down on the pots used and the steps.
1. Cut off the tough ends of the asparagus (typically the bottom 3rd. To test where it is, simply hold the top portion and the bottom of the asparagus and bend until it snaps. Where it broke is the best place to cut the bunch.)
2. Add the bottoms of the asparagus to the 5 cups vegetable broth in a pot, simmer for 20 minutes

3. Remove asparagus with slotted spoon and compost. Add remaining ingredients to broth and continue to simmer for about 20 minutes longer, testing the tenderness of the vegetables a few times along the way.

4. Once asparagus and potato are tender (meaning the fork goes through them easily and the asparagus have lost nearly all of their crunch), turn off the heat, add butter (optional), and use a stick blender or a regular blender to puree the soup.

5. Ladle into bowls and enjoy!

A little history is necessary before I can continue: one of the many reasons I resisted learning to cook for so long is that every time I tried in the past I would burn and/ or cut myself.

On cooking shows, or even when I just watch my mom, using a stick blender does not seem difficult… It was by far one of my most stressful cooking experiences so far. Boiling liquids and a tumultuou  stick blender that seems to have a mind of its own nearly led to the catastrophic burning of myself and my mom who was trying to teach me how to use it.

The blender glues itself to the bottom of pot and in order to get all of the chunks blended, my mom kept telling me to lift it off the bottom. However, I took this to mean picking it directly up off of the bottom and fighting the ridiculous amount of resistance that the blender created. When I would finally overpower the suction, I would inevitably yank it from the soup and spray boiling liquid everywhere as the blades spun out of the water. After nearly burning us three times my mom finally clarified that I just need to tilt the blender off the bottom. So much easier and less dangerous!

The soup itself was pretty good, especially when pared with the biscuits (recipe coming soon), but could use a bit more flavor. Next time I am going to try it with some herbs to spice things up a bit.
* Because asparagus can often be expensive, consider growing your own!

Sustainable Easter

Courtesy of sustainableeco
Happy Easter everyone. I hope you dyed your free range, organic Easter eggs with vegetables and enjoyed some fair trade, organic chocolate.

I Cooked! Spicy Sweet Potato Fries

I have been saying for quite a while now that I was going to learn to cook in order to be in more independent next year when I live in an apartment with my own kitchen as well as to be more sustainable and cook healthy meals out of local ingredients. I finally started!

Today I made spicy sweet potato fries for a snack as well as asparagus soup and buttermilk biscuits for dinner. I will share the fries first and the rest later in the week.
Ingredients:
2 medium sized sweet potatoes (each should be about 2 servings), cut into matchsticks
olive oil to lightly coat the cut potatoes
1/2 tsp each of paprika, cumin, chili powder, and black pepper
1/4 tsp each of garlic powder, onion powder, and salt
1/8 tsp cayenne pepper and cinnamon*
Organic and local are always best.
*if you do not like spicy foods or you are making these for children, you can leave out the cayenne pepper
These fries were super easy to make and much healthier than the battered and deep fried sweat potato fries found in most restaurants or frozen food isles. They also only take about 30-40 minutes depending on how quickly you can prep them.
Although I enjoyed eating this, I sadly struggled a bit to make them. I did not realize how difficult these oddly shaped sweet potatoes would be to peel, especially with their incredibly thick skin. Sometimes I would only get a few centimeters of skin off at a time. Once I got them peeled things went much better.
This recipe asked for the sweet potatoes to be coated in egg whites before being seasoned and baked, but that seemed a bit odd to me. In order to decide which would be best, I split the recipe in half and did half with the egg white and the other with a bit of olive oil (which is how my mom makes regular oven fries). Neither one was bad, but the olive oil had a better texture and cooked better. The ones coated in the white had a tendency to burn easier.
The ones with olive oil are on the left and egg white are on the right.

All in all these fries were a delicious snack, and they would have been even better if I had remembered to put in the chili powder : )